Table of Contents
“I try to do as much in camera as possible. Even shots that are achieved in camera need some post-production.”
–Peter Belanger, the man behind some of Apple’s epic product images
Post-production is critical in jewelry photography and all other product images. It is the defining element that separates a professionally-captured jewelry image from an amateurish one. Consider it as half of your artistic vision which must be done to complete your photography process. Nothing is perfect. And this remains true in the field of photography no matter how advanced your equipment is. Post-production or jewelry photo retouching is as important as your initial shoot, especially if you’re relying on product images to bring sales.
Welcome to Part 2 of How to Photograph Rings at a 3/4 Angle: The Jewelry Photo Retouching Process. If you haven’t read Part 1 which detailed the ring photography process, click the link and read through it.
NOTE: Part 2 is not an educational guide on how to retouch images. We, Picup Media, have simply put this together to answer the question of what each image goes through when we retouch it.
Read on!
What is Photo Retouching And How Can it Improve Your Jewelry Product Images?
Photography, Retail, and Advertising In the 1830s, Louis Daguerre introduced his gift to the world – the daguerreotype – the world’s first commercially and publicly known photographic process. It was a big…
The Jewelry Photo Retouching Process of a 3/4 Angled Ring
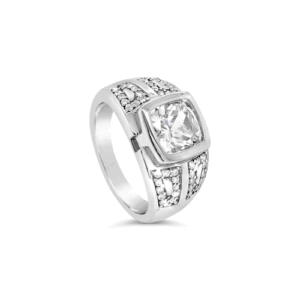
Before retouching


After retouching


Step 1.
Use a pen tool to mask out all the main elements of the ring. Pay attention very closely and remember to outline each element of the ring manually.

Step 2.
Next, retouch all the metal parts. This includes removing all dirt, scratches, and other flaws.

Step 3:
Continue the process by retouching the diamonds. Remember that each diamond must be touched up individually to ensure consistency in quality. An unretouched diamond will stand out negatively, and we don’t want that to happen.

Step 4.
After retouching, it’s now time to add shadows. A shadow is manually drawn based on the photographed subject, but it has to appear natural and realistic to add appeal to the overall look of the photo.
If you want to know how we’re able to capture jewelry pieces with beautiful reflections or shadows, click here to read the post with a quick 2-minute video tutorial

Final: The Secret
Well, there’s no secret, really. As evidenced by the process undertaken by our team behind Picup Media, quality jewelry photos like this are brought to life by pure attention to detail and hard work.
Click the link below to learn more secrets to post-production, so you too can produce studio-quality results.
Watch how we photographed this ring via our YouTube channel and discover how we did it in seconds with just an iPhone 7 and a GemLightbox. Our jewelry photography process enables us to shoot tons of jewelry items in just a short amount of time and a minimized effort in post-production. Just like how Peter Belanger put it, you have to start your photography process with the right equipment and techniques, so it doesn’t burden you when you reach the post-processing stage.
Got questions? Feel free to leave a comment below or shoot us a message. Enjoy photographing!
Ring Photography: How to Take 3 Killer Shots in Seconds Using the GemLightbox
Do you want to learn about quick and straightforward ring photography techniques using the GemLightbox? If so, this post is for you! Throughout history, rings have been known to symbolize…


2 Comments
This is a wonderful blog post. Thanks for some amazing ring photography tips.
It’s really lovely.