
Table of Contents
- Why Diamonds?
- How to Photograph a Diamond Ring
- Equipment used:
- Step 1. Place the diamond ring inside the GemLightbox.
- Step 2. Adjust your DSLR settings.
- Step 3. Click to capture.
- How to Photoshop a Jewelry Photo
- 1. Crop and resize the image.
- 2. Adjust ‘Levels’ to achieve a completely white background.
- 3. Sharpen the image.
- 4. Save the image and voila!
- Pros and Cons of Using a DSLR

Hello jewelers, welcome to another jewelry photography guide! In this post, we will show you how to photograph a diamond ring and take you to the post-production stage where you will learn how to Photoshop the ring from start to finish with no technical knowledge required.
First, let’s learn briefly about the meaning of diamonds.
Why Diamonds?
The word ‘diamond’ comes from the Greek word ‘adamas’, meaning invincible. Indeed, with a rating of 10 on the Mohs scale of hardness, diamonds are the hardest natural material in the world.
Such invincibility makes diamond the ideal gemstone to represent love. Diamonds symbolize power, strength, love, and romance. Hence, the popularity of diamond engagement rings as a symbol of unending love and rebirth. This tradition dates back to ancient times.
How to Photograph Diamonds
Learn how to photograph diamonds in this installment of the Gem Photography Series. Click the link for more details!
How to Photograph a Diamond Ring
For this session, we will be using a 60mm macro lens and a Fujifilm X-T2 camera, and the GemLightbox.
Equipment used:


We designed the GemLightbox for simplicity, so the photography process is almost foolproof — no grand setup or advanced skills required.
Step 1. Place the diamond ring inside the GemLightbox.
Attach your DSLR camera to the tripod and place the diamond ring inside the GemLightbox. We placed the GemLightbox 25cm away from the camera lens.
Step 2. Adjust your DSLR settings.
After placing the diamond ring, adjust your DSLR settings to get the quality you desire. We set the aperture to 11, a slower shutter speed, and set the exposure level to 1.
Step 3. Click to capture.
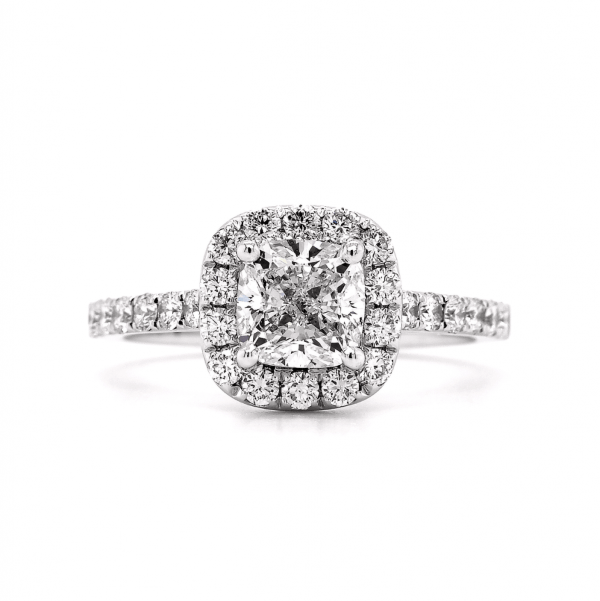
Once you’re happy with the settings, tap on your camera screen to focus and click to capture. See below.

Although the photo was sharp and somewhat acceptable, Photoshop can still improve its overall quality, including its grayish background.
You can also watch the complete photography tutorial below.
Smartphone vs DSLR Using the GemLightbox
Smartphone vs DSLR, which is better for jewelry photography? Click & read to know how each photography device can work to your advantage.
How to Photoshop a Jewelry Photo
In this section, we will show you how to polish a jewelry photo to perfection using Photoshop. We will be using the same photo we shot above.
Here’s our starting image.

1. Crop and resize the image.
We used the “Square” setting on the Fujifilm XT2 camera. The raw image came as 4000px x 4000px.
Currently, the image is at 45.8MB, which is far too large for any website. Since we will be using this image for web purposes only; so it doesn’t have to be that large. Hence, using canvas, we will resize it to 1500px x 1500px. This is the image size most compatible with most websites or online platforms.
To access canvas size, go to ‘Image’ > ‘canvas size.’


You will notice from above that there is very little white space in the image. We will need to add some padding by resizing the image.

Now, here’s how the image looks like after resizing.

2. Adjust ‘Levels’ to achieve a completely white background.

Levels in Photoshop help you correct the tonal balance and tonal range of the photo by adjusting the intensity level of shadows, mid-tones, and highlights of your image.
You can do the following:
- Darken shadows.
- Play with midtones to get diamonds the correct contrast.
- Push highlights higher until you get a white background.
Always refer to the histogram to achieve the proper color balance and tonal range.


3. Sharpen the image.

Sharpen the image with sharpening filters. We used Smart Sharpen in this image. Smart Sharpen is Photoshop’s most advanced tool for sharpening. It’s also easy to use.
4. Save the image and voila!

Here’s a side-by-side comparison.

How Can Photo Retouching Refine Your Jewelry Product Images?
What is photo retouching? Improve your jewelry product images with these five business-changing photo retouching services you can get online!
Pros and Cons of Using a DSLR
Overall, we spent 10 minutes in photography and Photoshop.
Photography: 5 minutes
Photoshop: 5 minutes
Pros:
- More detailed zoom capability.
- There’s a macro view of the diamond.
- You got flexible controls.
- You have a full control over depth of field.
Cons:
- Expensive.
- Maintenance cost. Camera lens should be kept clean all the time.
- Bulky.
- Transferring files from memory stick to the computer could be laborious.
- Detailed photography means you will also capture dust and other blemishes; hence, requiring post-processing all the time.
- Photoshop skills and knowledge are a must to get the results you want.
Jewelry photography doesn’t have to be complex all the time, especially if you are just photographing images for web purposes where a smartphone camera is capable of producing decent quality.
When photographing jewelry, consider not just the cost but also the time and effort involved as time wasted, when there’s a more efficient process, could have been time used productively to improve other aspects of your operation.
What’s your jewelry photography process? Do you use a smartphone or a DSLR? Let us know in the comment section below!


0 Comments