
Table of Contents
- Jewelry Photography Lighting Tip: Understand the fundamentals of light
- Jewelry Photography Lighting Setup Ideas
- 1. Backlighting for glass-like jewelry
- Backlit setup
- 2. Side lighting
- Side lighting setup
- 4. Make use of a lightbox
- Frequently Asked Questions
- Is a ring light good for jewelry photography?
- What light for gemstone photography?
- Is LED light better than Ringlight?
- What is the disadvantage of a ring light?

Jewelry photography or photography, in general, is all about capturing beautiful subjects using the available light. It revolves around controlling and adding light whenever you deemed necessary. This necessity is informed by the nature of the subjects you’re trying to photograph.
For instance, jewelry is one of the most challenging subjects to photograph in the field of commercial photography because of its highly-reflective materials that demand a complex lighting setup. Hence, to master jewelry photography, you have to understand the fundamentals of light.
The ability to take high-quality jewelry images is an integral skill in this day and age. The retail competition has moved from traditional to digital space; thereby, requiring more from jewelers.
As a jewelry retailer, you’re suddenly bombarded with different social media platforms and mobile applications. It’s noisy and crowded; sometimes, you’d feel it’s almost impossible to get found by your customers. If you feel this way, it’s time to brush up on your skills and summon the gods of light and creativity.
You’ll find that as you compete for the attention of your visual content-hungry customers, your traditional business approaches will no longer be sufficient. For instance, you’ll have to convince your potential buyers visually in the digital space and embrace the fact that online, high-quality jewelry images are the visual content superpower you’ll need to cut through the noise.
In this post, you’ll learn effective jewelry photography lighting setup ideas that you can apply to your next photo shoot. Whether you’re a jewelry retailer, designer, wholesaler, or anybody in the jewelry industry, these pointers are a surefire way to harness your superpower.
Let’s begin!

Jewelry Photography Lighting Tip: Understand the fundamentals of light
- Exposure
Exposure is the amount of light that reaches your camera sensor, which determines the lightness or darkness of the captured image. Good exposure is made up of three components: the shutter speed, ISO, and aperture.
The shutter speed controls the length of time it takes for the light to pass through the aperture of your camera or its circular opening. It’s measured in a fraction of a second. For example, 1/8, 1/250, 1/1000, and so on. By adjusting this value, you’ll get to control not only the light that passes through the aperture but also the look of the final image. Take note that a fast shutter speed can freeze any motion while a slow shutter speed results in the opposite. Normally, taking photos of jewelry doesn’t require motion; hence, you must consider whether you can hold still a camera with a fast shutter speed value and come up with sharp jewelry images. Otherwise, it will produce shaky, blurry images. This explains why others use a tripod.
The aperture is the circular opening of the camera lens. It’s measured in f stops. For example, f1.4, f8, f22, and so on. The larger circular openings are represented by a lower value, and the smaller openings are represented by a higher value. In the example above, the f22 has a smaller opening than the f8. By adjusting this value, you’ll get to control the amount of light that passes through the lens. The aperture (along with the focal length and distance between the photographer and the subject) plays a role in capturing well-focused images. Let’s say you want a shallow depth of field to bring focus to your jewelry; you’ll have to set the aperture at a lower value.
ISO is the sensitivity of the sensor to light. A combination of a fast shutter speed and a low-value aperture setting is required to get the correct exposure in a setting with higher sensitivity. Make sure that you adjust the ISO setting accordingly. Take note that higher sensitivity can lead to grainy images. Always use your informed judgment to achieve the right balance between these three components and consider your subject and environmental conditions. You may click here if you want to know more about shutter speed, aperture, and ISO.
Basic Photography Tips: How to Reduce Camera Shake When Taking Jewelry Images
These basic photography tips come in handy, especially when competing for brand presence and product visual appeal online. If you’re running a small online jewelry store, you have likely encountered…
- Quality
The next fundamental of light pertains to the quality of the light source. This is where you have to make the distinction between hard and soft light and warm and cool, among many others. It has been common knowledge that soft lighting makes a perfect lighting source for photographing jewelry because it helps control reflections, distributes light evenly, and captures color-perfect gemstones
Jewelry Photography Lighting Setup Ideas

1. Backlighting for glass-like jewelry
Backlighting is a process of leveraging the translucency of glass-like jewelry products by lighting them from behind. It’s a flattering lighting setup that provides the product with a crystal-clear look and appeal without distorting its shape. Setting up a backlighting technique at home is easy and inexpensive as long as you have the required materials.
Backlit setup
- Arrange your shooting environment
Locate an appropriate shooting area within your home or workshop – one that gives you the flexibility to move around and is free from any external factors that could damage the jewelry products. Jewelry pieces are fragile. You must find a space that wouldn’t scratch or break it. Use a strong platform like a table for an elevated photo shoot position that would help level the product and the lighting source, and place your light source directly behind the jewelry. Make sure that the jewelry is positioned the way you want it to look in the image and adjust the lighting source so that it hits directly through the glass without losing its shape. By correctly positioning your light source from behind, the edges, outer lines, and shape of your jewelry should become more prominent and well-defined.
When you’re done arranging and preparing your shooting area, find a light diffuser and foam core boards. The former should be positioned between your light source and your product and the latter under and on both sides of the product. The foam core will act as a light reflector evenly distributing the light around the subject while also controlling and eliminating harsh reflections and other undesirable blemishes. For the best result, you can also try adding another reflector on top of the product to have the light reflected from the top.
If you don’t have a foam core board, you can use alternatives such as light reflectors and diffusers. For example, a roll of white paper or pure white fabric.
How to Photograph Jewelry at Home
If you have been following this blog, you’d know by now that photographing jewelry is one of the most difficult tasks to carry. Many jewelers make too many mistakes not…

2. Side lighting
Side lighting is a visually-appealing lighting setup because it takes away a dull and uninspired look from a usually two-dimensional effect. It’s also ideal for showcasing the intricate details of your jewelry.
Side lighting setup
- Gather all the materials you need
Like your reflectors, diffuser, or umbrella if you have any, your light source, a roll of white paper, and foam core board. Work on the table for proper elevation and to level the light source and the jewelry. Once it’s ready, hang the white paper and let it sweep down under your jewelry. By sweeping it down, harsh shadows coming from paper creases and lines will be eliminated. It’s also an efficient way to achieve a pure white background for your product. A white background is often recommended for commercial product photography as it creates a non-distracting backdrop that’s easy on the eyes while adding a professional and sophisticated appeal to it.
Similar to the light diffusion process in the first jewelry photography lighting setup, ensure that you diffuse light by placing a light diffuser, it could be an umbrella or foam core board between the subject and the light, to perfectly control reflections and shadows, and eliminate glare. Because the side lighting setup is designed to overexpose details, you should be able to capture jewelry images with accentuated intricate details and surface textures. Finally, make sure that your jewelry is properly illuminated from the side as it adds more depth, as opposed to dull and flat, to your image.
3. Natural lighting
Natural lighting is the easiest and definitely, the most accessible source of lighting whether you want to photograph your jewelry in an indoor or outdoor setting. It provides you with an even distribution of light that perfectly illuminates your jewelry product, without other artificial light intervention.
When photographing using natural lighting, always remember to turn off other lighting sources as mixing different light sources could ruin the photograph. If you’re photographing silver jewelry on a white background under a natural lighting setup, all you need to add is a grey card to elicit contrast and achieve proper exposure. The grey card will guide you when it’s time to adjust the white balance setting and exposure time.
4. Make use of a lightbox
Photographing jewelry using a lightbox is the easiest way to achieve soft, diffused lighting. You can DIY a lightbox like other online jewelry retailers do and complement it with the lighting tip mentioned above. You may find this DIY process convenient and inexpensive, especially if you’re still in the infancy of your retail journey. As you go along, you’ll realize that you’d have to try a lot of alternatives. Some of it you may find disappointing, but with persistence, you’ll eventually stumble upon a process that will really work for you.
On the other hand, don’t be afraid to invest in photography whether tangibly or intangibly. For instance, we’ve learned to simplify the jewelry photography process for most of our clients by designing the GemLightbox for them. This portable, plug-and-play lightbox system eliminates the most overwhelming photo shoot concerns like lighting by designing it with a built-in lighting environment that’s ideal for jewelry photography.
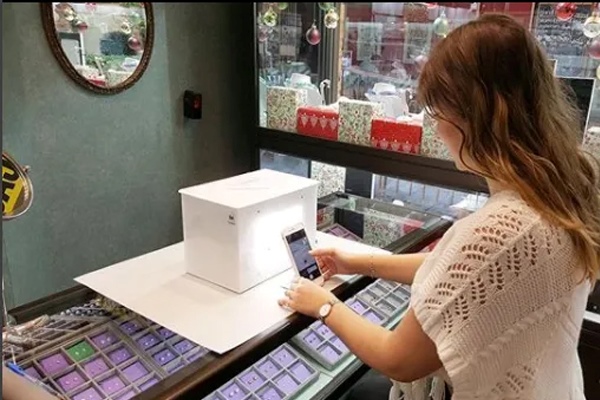
Jewelry photography lighting setup using the GemLightbox – Jewelers Keith & Molly, Sydney Australia
Always have the heart to explore and experiment with other jewelry photography lighting setups and equipment. You’d be surprised at how this mindset can make your business journey easier. As we established at the outset, your jewelry product images have the most significant potential to cut through the social media noise and the over-saturated online jewelry market. Don’t hold back. Take risks, be creative, and be innovative.
Frequently Asked Questions
Is a ring light good for jewelry photography?
A ring light is good for jewelry photography because it lights the rim of the piece. However, different jewelry pieces require different lighting setups. Experiment with different lighting techniques to find the one best for the type of jewelry you’re photographing.
What light for gemstone photography?
Choose a lightbox with built-in lighting. Light is critical when photographing gemstones. Excessive lighting means lights will come from all directions and reflect everywhere leading to a very bright gemstone with unwanted shadowed facets. The soft lighting from the lightbox ensures that your gemstone will get an even distribution of light with soft shadows and uniform lighting.
Is LED light better than Ringlight?
This depends on what you want to achieve and how you want your jewelry piece to photograph. A ring light is useful for macro photography while led lights are useful for product showcase and videography.
What is the disadvantage of a ring light?
Ring lights are often large and are brighter and more uniform compared to the natural, more diffused lighting that softboxes produce.
Do you know other jewelry photography lighting setups that may help other jewelers like yourself? Feel free to share and comment below!
Watch how we photographed a necklace pendant using the GemLightbox and a smartphone.


3 Comments
Thank you very much, your ideas help us to take good photos. If Some videos added better for understand ,
I really enjoyed reading this article about jewelry photography lighting setup. The last video was really helpful for me to understand the technique properly. Thanks for sharing such a professional article.
Thanks a lot , this is is really going to be useful in my journey to having good quality jewelry photography .